It's officially, official.
I will be an NAU graduate in 2015.
That's a year and half to go people!
Classes set up, financial aid in process, and target date made official. If you know anything about me, you know I stress. A LOT. Sometimes it's about things I can't even control. Ridiculous right?
I've spent so much time worrying what if it doesn't work out, what if I can't do it, I can't be in debt, but worst of all... what if I fail? All these questions without any action taken before now. As I walked out of my academic advisors office after my appointment to set all this up, I felt as though the weight of the world was lifted off of my shoulders. Aside from the fact that I am totally terrified, it's finally here.
I have a plan and I'm starting to change my view on what I'm gonna do.
It will work out as long as I keep trying.
Strive everyday to finish the goal I set out for.
Who cares about the money? (cringing as I type) This debt is positive because it's to better myself and my future family.
And most importantly, I can't fail unless I stop working.
I know this next year and a half will be a ton of work but I know I can accomplish my goal. I WILL have this degree before I am 23!
Tuesday, April 16, 2013
Tuesday, April 2, 2013
The Slight Glimmer
As you can see, my blog has undergone some design changes. I decided to become more blog savvy and learn how make it a little bit more customizable. I think it turned out pretty good!
Things have been great lately. I can't believe how fast this semester has gone, it seems like just yesterday I started my second fall semester and its already almost summer. Where did the time go?
*Cue the hallelujah chorus*
My newest update is this:
Last week I filled this bad boy out and this week I am turning it in!
I will officially be an NAU student despite all the work I've already put in towards my Bachelors degree.
I am so thankful that up until now, I haven't had to pay a cent towards my tuition (besides books and other school related expenses). However, when I get to NAU, that will all change. I am not one bit excited about the fact that I will be in debt a few thousand dollars..... I've done everything I can thus far to avoid it. Regretfully, debt seems to wrap its little finger around all of us.
Aside from the debt, I have a plan. I have a direction I will be pointed towards for the next year and some odd months. There seems to be a slight glimmer of light at the end of the tunnel.
I know this sounds funny, but I am excited to be done with school and just work a job. I know that I will be working the rest of my life and that I should enjoy the time that I am at right now, I just can't wait to be done with studying and homework.
Here's to the future!
Things have been great lately. I can't believe how fast this semester has gone, it seems like just yesterday I started my second fall semester and its already almost summer. Where did the time go?
*Cue the hallelujah chorus*
My newest update is this:
Last week I filled this bad boy out and this week I am turning it in!
I will officially be an NAU student despite all the work I've already put in towards my Bachelors degree.
I am so thankful that up until now, I haven't had to pay a cent towards my tuition (besides books and other school related expenses). However, when I get to NAU, that will all change. I am not one bit excited about the fact that I will be in debt a few thousand dollars..... I've done everything I can thus far to avoid it. Regretfully, debt seems to wrap its little finger around all of us.
Aside from the debt, I have a plan. I have a direction I will be pointed towards for the next year and some odd months. There seems to be a slight glimmer of light at the end of the tunnel.
I know this sounds funny, but I am excited to be done with school and just work a job. I know that I will be working the rest of my life and that I should enjoy the time that I am at right now, I just can't wait to be done with studying and homework.
Here's to the future!
Saturday, March 30, 2013
Kitchen Sprucing: Part 2
After completing my first project, I couldn't wait to start my next one. I took a look at some of the supplies that I had laying around and found that I could put some of them to use instead of going out and buying a bunch of stuff.
My handsome man is the most thoughtful person I have ever met. After a long day, before a date night, or even just because, I find the most beautiful floral arrangements when I walk in the door. I'm not talking grocery store bouquets, I'm talking floral shop arrangements with beautiful bows, gorgeous greens, and the freshest most fragrant blooms ever. They look as though they had just been picked. I am completely spoiled by him.
Many times I find myself wondering what to do with some of the vases that these arrangements come with and I end up sticking them under our sink until I need them for other floral arrangements or other things. This DIY, I was able to utilize some of those vases that I hadn't used as much as others.
I also wanted some accent pieces to go along with the painting I made for our kitchen since I decided not to hang it on the wall, but rather, place it on the shelf of our sunk in cabinets.
I thought the pieces really complimented each other. On top of that, both projects didn't cost very much. Win/Win.
I started out by washing the vases since I knew I wasn't going to be able to wash them in the sink ever again. Wrapping the first strand can be a little awkward since you don't have anything to line it up to, so eyeballing the first wrap around so that it is straight with the top edges of the vase is easiest. I took my Tacky Glue bottle and made circle/zigzag marks around the top section of the vase so that I didn't have to apply glue every wrap around I did. Because this glue dries clear, I didn't have to worry about the glue showing through the inside,
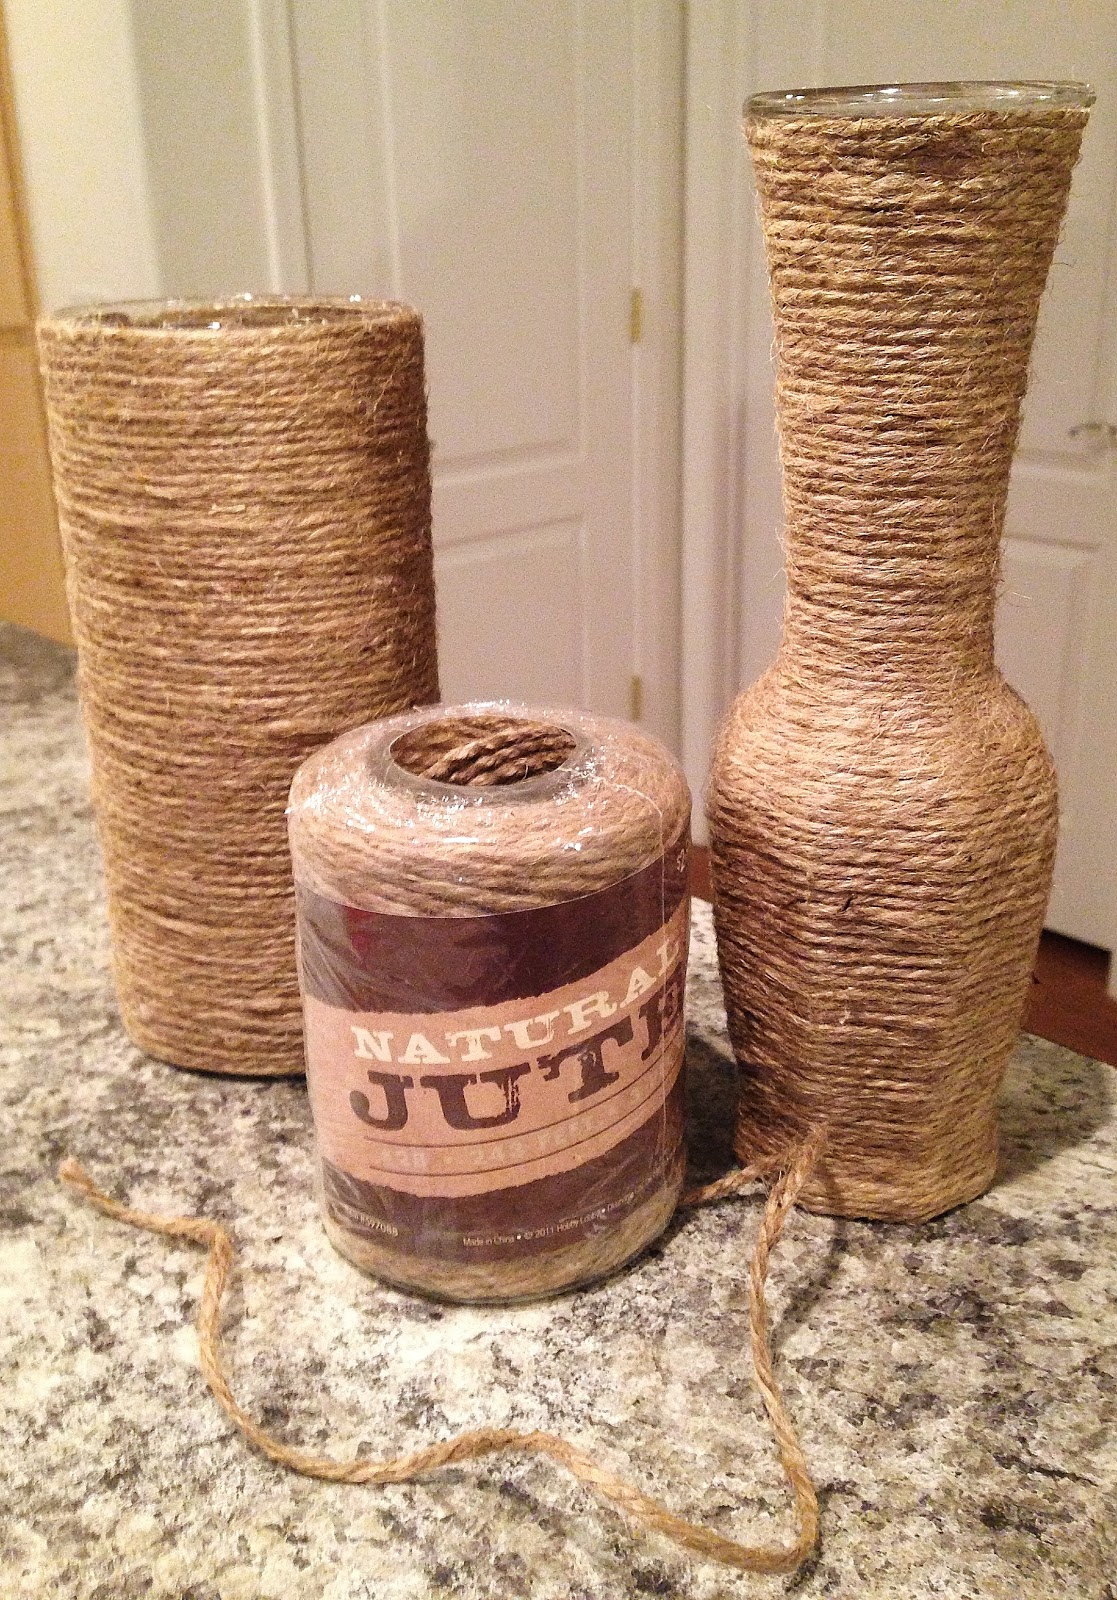
As you can see, I didn't cut a length of twine because I wasn't sure how much I would need. Most of the reels you can get at any craft store unwrap from the inside, so I left the wrapping on and kept pulling out length as I went along. Every wrap around I did, I made sure to check that my twine was horizontal with my vase, not angled. I didn't want to get to the bottom and have it be uneven, so I made sure that I placed every length directly next to the previous line. Because Tacky Glue is forgiving and dries clear, if you mess up you can unwind the lines if you mess up the angle. All you have to do is re-apply the glue.
Side note: This project will make your fingers sticky because of the glue. I suggest not doing your nails before.
When you get to a point where glass starts to run out when you are towards the end, I have two tips.
1. If you can stretch the length to meet up with your starting piece at the top, you can hide your ends better. This way they are close to each other vertically and you can turn it away from peoples sight.
2. Make sure you really cover the ends with glue. If you don't, it can come undone/unravel, making it a pain to repair later.
The twine that I bought had such longevity! Even after two whole vases, I still had almost a full roll left for other projects. $2.99 for a roll that will last forever, awesome!
Because I allowed it to unwind from the middle instead of the outside, it made it so much easier to store after as well. I didn't have to worry about it falling out of the closet and unraveling as it hit the floor.
I decided to use raffia as my accent to my vases because it was what I had from another project. It just to happened to match the maroon color in my painting, which advanced my decision. After this project I ended up doing this same procedure to an old candle holder and I added a shimmery band across the top. The possibilities are endless, even seasonal.
These two projects really helped take up some of that empty space above our barren cabinet space. I was so pleased with the results!
My handsome man is the most thoughtful person I have ever met. After a long day, before a date night, or even just because, I find the most beautiful floral arrangements when I walk in the door. I'm not talking grocery store bouquets, I'm talking floral shop arrangements with beautiful bows, gorgeous greens, and the freshest most fragrant blooms ever. They look as though they had just been picked. I am completely spoiled by him.
Many times I find myself wondering what to do with some of the vases that these arrangements come with and I end up sticking them under our sink until I need them for other floral arrangements or other things. This DIY, I was able to utilize some of those vases that I hadn't used as much as others.
I also wanted some accent pieces to go along with the painting I made for our kitchen since I decided not to hang it on the wall, but rather, place it on the shelf of our sunk in cabinets.
Here is the look I ended up with after my last project and this one:
I thought the pieces really complimented each other. On top of that, both projects didn't cost very much. Win/Win.
To make the vases I used:
Two recycled vases
Jute Twine
Tacky glue
Red raffia
I started out by washing the vases since I knew I wasn't going to be able to wash them in the sink ever again. Wrapping the first strand can be a little awkward since you don't have anything to line it up to, so eyeballing the first wrap around so that it is straight with the top edges of the vase is easiest. I took my Tacky Glue bottle and made circle/zigzag marks around the top section of the vase so that I didn't have to apply glue every wrap around I did. Because this glue dries clear, I didn't have to worry about the glue showing through the inside,
As you can see, I didn't cut a length of twine because I wasn't sure how much I would need. Most of the reels you can get at any craft store unwrap from the inside, so I left the wrapping on and kept pulling out length as I went along. Every wrap around I did, I made sure to check that my twine was horizontal with my vase, not angled. I didn't want to get to the bottom and have it be uneven, so I made sure that I placed every length directly next to the previous line. Because Tacky Glue is forgiving and dries clear, if you mess up you can unwind the lines if you mess up the angle. All you have to do is re-apply the glue.
Side note: This project will make your fingers sticky because of the glue. I suggest not doing your nails before.
When you get to a point where glass starts to run out when you are towards the end, I have two tips.
1. If you can stretch the length to meet up with your starting piece at the top, you can hide your ends better. This way they are close to each other vertically and you can turn it away from peoples sight.
2. Make sure you really cover the ends with glue. If you don't, it can come undone/unravel, making it a pain to repair later.
The twine that I bought had such longevity! Even after two whole vases, I still had almost a full roll left for other projects. $2.99 for a roll that will last forever, awesome!
Because I allowed it to unwind from the middle instead of the outside, it made it so much easier to store after as well. I didn't have to worry about it falling out of the closet and unraveling as it hit the floor.
I decided to use raffia as my accent to my vases because it was what I had from another project. It just to happened to match the maroon color in my painting, which advanced my decision. After this project I ended up doing this same procedure to an old candle holder and I added a shimmery band across the top. The possibilities are endless, even seasonal.
After the glue dried, I placed them in their home above our cabinets.
These two projects really helped take up some of that empty space above our barren cabinet space. I was so pleased with the results!
Subscribe to:
Posts (Atom)


.jpg)