Tuesday, April 30, 2013

DIY Sugar Scrub

Although April's DIY is a little late in posting, I didn't forget to do one!

The past two months have been pretty crazy with finals, school ending, and getting things done to be admitted to my next step; NAU. Words cannot describe how great it feels to no longer have to worry about this stuff anymore, it's done! 

Aside from doing those things, I have been spending a lot of time considering what I wanted to do this month for my DIY. With summer fast approaching, pedicures and manicures are becoming bright, bold colors. As the darker tones disappear until fall comes to us again, I started to notice that my hands and feet were becoming pretty dry. 

Now when I say dry, I mean DRY. My hands are prone to being dry anyways, but with this Arizona heat, it's hard for skin to stay moisturized all day. One of the reasons for this is because the top layer of our skin dries out and although the layers underneath may be healthy, it's hard for moisture and lotion to bring those dry layers back to life. This is why it's important to exfoliate! 

I could have easily went to the store and grabbed the first bottle of hand or foot scrub I saw, but those products are so expensive and they have harsh chemicals that aren't always so great for us and end up drying out skin even worse than before. For this DIY I decided to make my own. 

There are plenty of different ways to make various scrubs, but I tailored this one to my hands and feet. 
My hands tend to get really shiny and oily when I use certain lotions or body products. After looking at different ways to make scrubs on the internet, I decided on one that avoided oils for my first go around. It's also ridiculously easy AND cheap.


To make this scrub, you only really need two ingredients; sugar and Dawn brand dish soap with Olay hand renewal. The reason for this soap and not others is that this soap is specifically formulated to add moisture back into your hands while doing dishes. It's creamier than other typical dish soaps that tend to dry hands out. 

You can definitely make this scrub when you need it without pre making it, but I decided to pre make mine and put it into a container. It just makes it easier to have a container of it next to my sink for me to use whenever I want to. 


In order to measure out the correct amount of sugar, and since this is the volume of the product, I poured the sugar into the container I was going to keep it in.


I filled it to the bottom of the lip of the jar. Since the sugar tends to condense when any type of liquid comes into contact with it, I knew this was a safe place to start.


I added the sugar from my container to a larger bowl so that it was a little bit easier to mix the ingredients together. 


There really is no specific amount of soap to add. I started with a little amount and worked my way up to the consistency that I preferred.

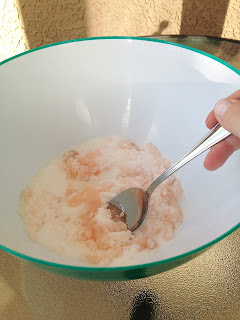
When adding the soap to the sugar, it really sticks to the sugar that it first comes into contact with resulting in chunks. If you keep kneading the mixture together, the rest of the sugar will stick to the soap. You can tell by looking at it if you need to add more soap or sugar, but try to make it look like the consistency of frosting (although, I don't think it would taste as good haha!). Also during this step I added more sugar and more soap because I knew that the sugar that I had originally had would condense once the soap was added, making less scrub.

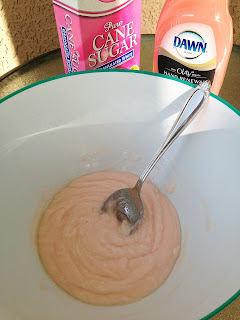
This is the consistency it should have. I didn't want mine to be too liquid-y just because I wanted a thick scrub. If your skin needs just a little buffing, you could add more soap so that it's not super thick and abrasive. This is also the step where you could add some essential oils if you wanted them. I opted out for my first go around. 

When I was finished mixing it together, I added it into this cute little container and added a twine bow!

 I pair this scrub with Goldbond hand lotion and it is the best combo! Using a lotion with any exfoliating scrub is a great idea.

After using this scrub before bed consistently for about a week, I noticed that my hands were much healthier in their look and feel. This also makes a nice scrub for those rough cuticles or callouses that you may obtain after a long day at work. If you love manicures and pedicures like I do, this makes an awesome first step. It gets your nails and hands clean and exfoliated, which is a great foundation for nail polish!

Do you have someone that you need a gift for but don't have a ton to spend? This makes a wonderful gift AND it's thoughtful for someone like a mother or a sister. 

Enjoy!

Thursday, April 25, 2013

Our Own Kind of Perfect

Who would have guessed that two years ago, I would have found the man of my dreams? For some people it's really hard to find that special person that makes your heart sing. For me, my man makes my life a symphony.

Sure, things aren't always easy, but that's the point. Love in itself isn't easy. The falling in love part is always the easiest; when your heart flutters every time your with that special person or when you smile for the simple fact that your are irrevocably infatuated with someone. Those are the feelings that people come to know and love. The newness and wonder of what will be and if this is the person you are supposed to be with. However, the staying in love part is the component that needs continuous nurturing. Without the will of both people and the ambition to keep it going, love can eventually fade.

I'm so thankful to have such a lovely man who is always willing and completely ambitious to keep our love growing.

With Austin and I, I knew from day one. I know how completely cliche that sounds, but when you know, you just know. I felt it. Our time spent together, even after two years, still gives me those addicting feelings you experience in a brand new relationship.

I won't lie and say that our relationship is perfect, we definitely have had our tough times. It's those tough times that have tested us and made us love each other more.

I have never loved anyone more than I love this wonderful man. He puts up with me when I am completely crazy and brings me back to earth when life seems hopeless. We can laugh and cry together and be completely ourselves. He completely supports anything I choose to do and encourages me to be a better person and to better myself. We are each others cheer leaders and push each other to do things we have never thought to do before. We take the flaws that we think we have and make them out to be the best qualities in each other. We are our own kind of perfect.

My life would not be the same without this wonderful man. I am so thankful that he chooses me everyday despite all the craziness that happens. Do we drive each other crazy? Sure we do, and we are the best at pushing each other buttons. The greatest part? One second we can be arguing about something totally ridiculous and heated, the next second we are laughing and realize just how ridiculous we were being in the first place.

We have done and have been through so many wonderful-crazy-ridiculous things these past two years. I have learned and experienced things that I would never change in a million years. I want to spend the rest of the time that I have with this wonderful man because I know I wouldn't be the same without my other half.

I love you Austin and I can't wait to see what forever holds for us!

Want to see how we celebrated our anniversary? Pictures below! You all know how much I love to take pictures!


This man always spoils me with the most wonderful flower arrangements. I can't help but love how thoughtful he is!


One thing that we love is the spontaneity of being together. A wonderful surprise visit from THE MOST handsome man I've ever seen after work on our actual anniversary date. We love lunch dates during the week when we can snag them!


We spent a wonderful night in Scottsdale at the most beautiful resort! It was the most relaxing and wonderful night we have spent away in forever!


Did I mention this resort was beautiful?? Temperpedic beds and the most beautiful hotel room I've ever been in. We had a hard time leaving!


What kind of resort would it be without bathrobes that make you look like a karate student??


After regretfully checking out of our hotel, we stopped at the Breakfast Club for breakfast. If you like the hipster, healthy, modern type of breakfast, this is the place for you. This juice was literally the best orange juice I have ever tasted! 
 

Need I say more? This breakfast was DEE-LISH.
 

As a gift to ourselves, we decided to buy our first set of patio furniture! This awesome set was at an amazing price that we couldn't pass up! Hooray for sunset/sunrise meals on the patio. Ahhh.. the little things! Teehee!


I love taking pictures with my handsome love! I can't help but gawk at how ridiculously handsome he is!

Tuesday, April 16, 2013

2015, Officially Official

It's officially, official.


I will be an NAU graduate in 2015.

That's a year and half to go people!

Classes set up, financial aid in process, and target date made official. If you know anything about me, you know I stress. A LOT. Sometimes it's about things I can't even control. Ridiculous right?

I've spent so much time worrying what if it doesn't work out, what if I can't do it, I can't be in debt, but worst of all... what if I fail? All these questions without any action taken before now. As I walked out of my academic advisors office after my appointment to set all this up, I felt as though the weight of the world was lifted off of my shoulders. Aside from the fact that I am totally terrified, it's finally here.

I have a plan and I'm starting to change my view on what I'm gonna do.

It will work out as long as I keep trying.

Strive everyday to finish the goal I set out for.

Who cares about the money? (cringing as I type) This debt is positive because it's to better myself and my future family.

And most importantly, I can't fail unless I stop working.

I know this next year and a half will be a ton of work but I know I can accomplish my goal. I WILL have this degree before I am 23!

Tuesday, April 2, 2013

The Slight Glimmer

As you can see, my blog has undergone some design changes. I decided to become more blog savvy and learn how make it a little bit more customizable. I think it turned out pretty good!

Things have been great lately. I can't believe how fast this semester has gone, it seems like just yesterday I started my second fall semester and its already almost summer. Where did the time go?

*Cue the hallelujah chorus*

My newest update is this:


Last week I filled this bad boy out and this week I am turning it in!

I will officially be an NAU student despite all the work I've already put in towards my Bachelors degree.

I am so thankful that up until now, I haven't had to pay a cent towards my tuition (besides books and other school related expenses). However, when I get to NAU, that will all change. I am not one bit excited about the fact that I will be in debt a few thousand dollars..... I've done everything I can thus far to avoid it. Regretfully, debt seems to wrap its little finger around all of us.

Aside from the debt, I have a plan. I have a direction I will be pointed towards for the next year and some odd months. There seems to be a slight glimmer of light at the end of the tunnel.

I know this sounds funny, but I am excited to be done with school and just work a job. I know that I will be working the rest of my life and that I should enjoy the time that I am at right now, I just can't wait to be done with studying and homework.

Here's to the future!

Saturday, March 30, 2013

Kitchen Sprucing: Part 2

After completing my first project, I couldn't wait to start my next one. I took a look at some of the supplies that I had laying around and found that I could put some of them to use instead of going out and buying a bunch of stuff.

My handsome man is the most thoughtful person I have ever met. After a long day, before a date night, or even just because, I find the most beautiful floral arrangements when I walk in the door. I'm not talking grocery store bouquets, I'm talking floral shop arrangements with beautiful bows, gorgeous greens, and the freshest most fragrant blooms ever. They look as though they had just been picked. I am completely spoiled by him.


Many times I find myself wondering what to do with some of the vases that these arrangements come with and I end up sticking them under our sink until I need them for other floral arrangements or other things. This DIY, I was able to utilize some of those vases that I hadn't used as much as others.

I also wanted some accent pieces to go along with the painting I made for our kitchen since I decided not to hang it on the wall, but rather, place it on the shelf of our sunk in cabinets.

Here is the look I ended up with after my last project and this one:


I thought the pieces really complimented each other. On top of that, both projects didn't cost very much. Win/Win.


To make the vases I used:
Two recycled vases
Jute Twine
Tacky glue
Red raffia

I started out by washing the vases since I knew I wasn't going to be able to wash them in the sink ever again. Wrapping the first strand can be a little awkward since you don't have anything to line it up to, so eyeballing the first wrap around so that it is straight with the top edges of the vase is easiest. I took my Tacky Glue bottle and made circle/zigzag marks around the top section of the vase so that I didn't have to apply glue every wrap around I did. Because this glue dries clear, I didn't have to worry about the glue showing through the inside,


As you can see, I didn't cut a length of twine because I wasn't sure how much I would need. Most of the reels you can get at any craft store unwrap from the inside, so I left the wrapping on and kept pulling out length as I went along. Every wrap around I did, I made sure to check that my twine was horizontal with my vase, not angled. I didn't want to get to the bottom and have it be uneven, so I made sure that I placed every length directly next to the previous line. Because Tacky Glue is forgiving and dries clear, if you mess up you can unwind the lines if you mess up the angle. All you have to do is re-apply the glue.

Side note: This project will make your fingers sticky because of the glue. I suggest not doing your nails before.


When you get to a point where glass starts to run out when you are towards the end, I have two tips.

1. If you can stretch the length to meet up with your starting piece at the top, you can hide your ends better. This way they are close to each other vertically and you can turn it away from peoples sight.
2. Make sure you really cover the ends with glue. If you don't, it can come undone/unravel, making it a pain to repair later.


The twine that I bought had such longevity! Even after two whole vases, I still had almost a full roll left for other projects. $2.99 for a roll that will last forever, awesome!

Because I allowed it to unwind from the middle instead of the outside, it made it so much easier to store after as well. I didn't have to worry about it falling out of the closet and unraveling as it hit the floor.


I decided to use raffia as my accent to my vases because it was what I had from another project. It just to happened to match the maroon color in my painting, which advanced my decision. After this project I ended up doing this same procedure to an old candle holder and I added a shimmery band across the top. The possibilities are endless, even seasonal.


After the glue dried, I placed them in their home above our cabinets.


These two projects really helped take up some of that empty space above our barren cabinet space. I was so pleased with the results!

Tuesday, February 26, 2013

Kitchen Sprucing: Part 1

Our kitchen needed some serious DIY attention. All the lovely wall space along with a wonderful sunken in area above our cabinets was completely blank. No personality, pale, and completely blah. I am the kind of Pinterester that loves to pin all these creative things but can never seem to decide on an idea. I think it's my need for constant perfection. I am always worried it won't come out as good, not to mention, when I go to the art store I always wind up spending way too much time looking because I can never make up my mind.

Thankfully I have a wonderful man who supports any artistic idea I have AND he calms me down when it doesn't go the way I think I want it to.

Considering the time it took to decide what I wanted to do with all the space, it's going to take a few projects to satisfy my need to fill up the empty space. I do have to start somewhere right?

I decided on this:


I have had my eye on this wall art for the past few weeks. Besides the simplicity that it radiated, it seemed like the perfect thing for my kitchen. Since our kitchen lacked a style scheme, it was nice to have a blank slate to work with. (Also, I've been on a canvas inspiration lately. I can't help how much nicer it makes certain projects look!)
 

I started with these supplies:


For me, the most expensive part of this project was the stencils. I think one thing that always kept me from crafting much was the fact that it can be really expensive, especially when you are just starting out from ground zero with no supplies of any sort. After awhile, I realized that crafting for me is a stress reliever. Some people pay therapists, I pay for art supplies.

Hobby Lobby has a great selection of value canvases that come in a two pack. I got two 11X14 sized canvases for $8. The stencils were pricey given the fact that they were flimsy plastic that I ended up having to cut up, but I can save them and use them for other projects. The brushes I already had from a previous project, and the paints were less than $1.50 each.

I started out by painting my canvas a cream color. I knew that our kitchen had a lot of brown, black, and neutral tones in it, but I didn't want to do a off the wall color because I wanted it to be versatile if/when we move someday or taste changes. Plus, I thought it would be better to offset it with subtle colored accent pieces.


After the paint dried and I finished prepping for my next step, I dabbed a tiny round foam brush in some black paint and went at it.


Cutting the stencil letters that I needed out from the big sheet made it a lot easier to place them where they needed to go. When Austin came home and found me upset that my letters didn't turn out so clean cut and perfect, he told me he liked it and it gave it some character. This is why I love him so! 
 
I agreed after my perfection OCD stopped poking me in the side every two seconds. The ruggedness of the letters along with the color I chose for my canvas gave the over all look of a vintage/burlap style.


Mine turned out like this.

(Disregard the slight pink twinge to it, the lighting wasn't working in my favor). I think it turned out pretty well and it made a nice edition to our becoming kitchen. The thing I really like is that it is totally personal and original. Any words, maybe a favorite recipe or phrase tailored to your kitchen's feel, make a nice art piece to look at.

Saturday, January 12, 2013

2013: The Year of the DIY

With the New Year finally here and 2012 closed, I am SO thankful that 2012 is over. I don't know about a lot of other people, but 2012 definitely wasn't in my top 5. I was elated to say goodbye to 2012 and start the New Year with a kiss from my handsome man.

With 2013 here, my current life is back to normal with constant school, work, and spending time with my handsome love. When the fall semester came to an end, I was the happiest girl alive to have a few weeks of break to get ready for the holiday season. Spending time with my family and Austin was SO nice after being so busy in the hustle and bustle of the previous few months. Although I love the holiday season, it's nice when it's over and your space can be cleaned up of all the holiday decorations, smells, and wrapping paper. Now that January is here, I want to start the year off right and make 2013 different from 2012.

I love to be creative. There is just something so amazing from being able to work on something you love and see the end results. For me, cooking and sprucing up areas that need work in Austin and I's space are such stress relievers. I know that men like to make jokes about women and their "rightful" place in the kitchen, but my thing is, I LOVE to be in the kitchen. I have often times told Austin that I just need to relieve some stress and cook or bake something to blow of some steam. He doesn't complain, since my stress relief often ends in him getting to indulge in yummy food :)). Crafting also is another stress reliever for me that allows me to create things I don't normally get to.

Last week, I was in an awful mood. It seemed like everything was just going wrong and I had no idea how to cope with any of it. I felt (and did) like curling up in a ball and just laying under the covers of my bed, never to come out. Then one morning, I woke up and just had to do something with my busy, over stimulated mind.

Being an avid Pinterester, I am always pinning and looking at different craft projects that people do. Sometimes I can spend hours just scrolling through different ideas that people have come up with for their creative minds. Always pinning, but never doing, I always have different ideas up my sleeve. The morning that I woke up and just had to do something with my crazed mood, I rushed to the art store, and finally bought stuff to put my crazy mind to work. It was the most odd feeling ever, like something was literally pushing me out the door to accomplish something creative that day.


This was the end product of my crazed mind. I think that I found that I can be quite productive when I need to relieve some stress!

If you are an avid Pinterester, I am sure you have seen these ideas before:


Seeing these ideas and not really hating, nor loving either idea, I decided to mix the two together for my project. I don't know about you, but I think mine turned out great! It really spruced up my room at my parent's house and it made my room look more mature and brought together all the colors of my space together in one collective art piece.
 
At the art store, I flew in knowing exactly what I needed and wanted. It also helped that I had a gift card to make the purchases since I started without any of the necessary materials :).
 

What I needed for this project:
  1.  Canvas - Canvas can be pretty expensive. After some careful looking, I found a value pack with 2 in them for a pretty good price. I bought two different sizes of these value packs for about $10.
  2. Paint - I spent a few minutes looking at different paint shades. I knew what colors I wanted, but the shades were the important part. I unscrewed the cap of the paint bottle in the store to see the actual shade because some of them looked different from the bottle color. A little brighter or darker than what I wanted, so it's a good thing I checked. In the end, I picked a green, blue, grey, white, and red color. Paint can vary in prices, but with these on sale, I spent about $5.
  3. Paint Brushes - I picked cheapy ones because I knew this project didn't require expensive or nice brushes.
  4. Wood chips in the shape of letters - After spending a few minutes searching around the store for them, I found them where they keep all the wood boxes and wood shapes you can paint yourself. I bought two packs because I wouldn't have enough letters for what I wanted to spell for my project. These were the most expensive part, about $4 a box for 60 letters.
  5. Tape

I started out by painting each canvas with a couple coats of paint. I wanted to make sure that none of the white canvas showed, so I also painted the sides too. Make sure while doing this to paint underneath the back of the canvas a little bit (where the wood of the canvas is showing) so that you can't see any of the white showing when it is hung up.

Painting....
Even more painting....

After they were touched up and done drying, this was the product. This was my first time painting with canvas and it was pretty easy. While waiting for the canvas to dry, I took an Emory Board file and filed the imperfections out of the wood letters I needed. It makes it so much easier to paint them when they are not rigid. I used white paint to paint the letters and used about 3 coats so they showed up really white against these colors on my canvas.


I chose the words, "Inspire" "Create" and "Succeed". I think that I needed to learn that when I am inspired, I really should create something to succeed in whatever it is I want to succeed in instead of saying, "I'll do it some other time," or "Maybe later". I think these are words that we can all live by.

My next step, shown in the above picture, was to connect the letters to my canvas. I wanted to connect them in a way so that if I wanted to re-arrange them at another time or re-work the orientation of my canvas, the letters were removable. I thought it would have been a cool idea to use magnets to connect the letters, so there was no tape having to be involved, but the magnets weren't powerful enough and I had to resort to tape.

I doubled the tape so that it was sticky on both sides and cut it into little pieces so that they couldn't be seen when looking at the final product. I attached the tape to the back of the letters and stuck them on my canvas according to the look I was going for.

This lovely idea was inspired by a Christmas Ornament Exchange this year. Austin's sister Rachel made one similar to this as an ornament for our tree! :)

I also wanted to incorporate these roses since they are interesting to look at and if done right can look quite vintage. Many people use up cycled old book pages to make these. Since I wanted my project to go in the direction of a more classic clean look, I decided to use old photocopied sheet music. There were no original works harmed in the process of this DIY :). Also, I couldn't wrap my mind about destroying any of my book pages in my books, so this was the next best thing. I also have a lot of music themed pieces of art in my room as well and figured it would be a nice way of tying them together with this project.


My next challenge, after everything was attached to the canvas, was to hang them. These canvas didn't come with wall hanging attachments, so I improvised and hung them with some good ol' nails and a hammer. The wood on the backside of the canvas makes a good way to hold them on the wall as long as you don't have anyone to mess with them and puncture the outside canvas with the nails on the inside.


Here you go! Original wall art that anyone can make and it looks clean and mature with the canvas presentation. I encourage anyone who has an artistic need and a wall that needs some modern sprucing up to make these! These words can be changed to decorate a baby's room, display photographs, or even just paint on a painting! The thing I like about this project is since the letters are removable, they can be re-used together or separately with a different theme :)

 
 I have also decided that since this project turned out so great that I am going to do a different project each month. I know at some point during each month I will need to do something constructive besides work and school work to keep my mind occupied heehee :). I am thinking some new recipes or other home decorating ideas! I can't wait to share my projects with you :) I am excited to see what a year of DIY looks like!

Tuesday, January 1, 2013

About

Welcome to my blog!

You may be wondering where the title of my blog came from. I would be too if I read a blog name that wasn't very specific to something. To be honest, I have found that writing is an outlet for the wide range of emotions that I have felt. There is something to be said about writing and for me, it has always come easy. I couldn't see myself writing in a diary without feeling slightly juvinile, and aside from that, blogging allows me to be more creative and organized.

Win/win if you ask me! :)

I hope that in my writing about things that can happen to all of us, that someone might be able to relate.We all go through so many various points in our lives and it's okay. We are all human.


I have also found that creating something with my hands helps get my mind off of things. I like to use some of my spare time to allow my mind to shut off for a few hours and let my creative side take over. Let me tell you, sometimes it is the best way to work through the ways that I feel. There isn't a better feeling than to take something that is making you sad, mad, happy, etc and see its end results in something you can look at.

My main goal is to create constructive ways for dealing with things that we all have to deal with. I hope that in my journey to do that that someone else can take away from it too!